Tuesday, September 14, 2010
How to grow tulip
By an eHow Contributor
I want to do this! What's This? ..
One of the most popular springtime flowers is the tulip. Tulips are easy to grow. You only need to have a bit of space to plant the bulbs in the fall. Then just wait for those bulbs to grow into bright, sunny flowers that herald the coming of spring.
.Difficulty: Easy
Instructions.
Things You'll Need:
Tulip bulbs
Shovel or spade
Fertilizer
1Plan your tulip garden in the fall. Late October or early November is the best time to plant tulip bulbs. Stagger tulip bulbs that are early bloomers with mid-season and late bloomers to prolong the blooms in your tulip garden.
2Replace bulbs that are over three years old. Fertilize the tulip bed if you aren't digging up any old bulbs.
3Dig a new tulip bed in a sunny location about a foot deep. Use a shovel or spade or tiller to turn the ground. Work fertilizer into the soil.
4Plant the tulip bulbs about one to two inches below the ground. Make sure the root portion of the bulb is pointing down. Space the tulips about six inches apart.
5Put mulch over the tulip bulbs if you live in a cold climate. If you live in a more moderate climate you can skip this step. Remember to remove the mulch as soon as the ground begins to warm in the spring.
6 Cut the tulips for indoor use if you like. Remove tulip heads from the plants as soon as they begin to fade. Leave the green stems alone for a while because they are feeding the bulb so it can grow and bloom again next year. Once the foliage dies, you can cut it back as well.
Sunday, July 4, 2010
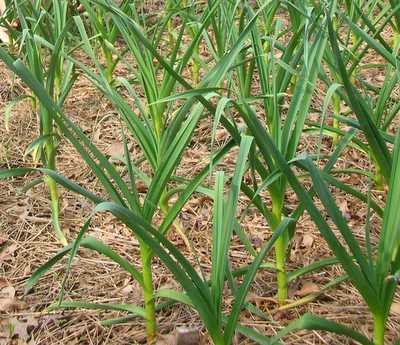
How to Grow Garlic
Instructions.
Things You'll Need:
 •Bypass Pruners

Step 11Begin harvesting bulbs when about 3/4 of the tops are yellow
Things You'll Need:
•Bypass Pruners •Compost Makers
•Fertilizers
•Garden Spades
•Garden Trowels
•Mulch
•Plants
•Seeds
•Shovels
•Seeds
•Plants
•Shovels
Step 1Buy garlic bulbs at the nursery in late fall or early winter (it's unlikely you'll find started seedlings). You'll plant cloves directly in the ground about six weeks before the soil freezes. In mild climates, plant in January or February for harvesting in late summer or early fall.
Step 2Choose a garden site that gets full sun. Though garlic will grow in soil with any pH from 5.0 to 8.0, it does best in the slightly acid range (6.2 to 6.8).
Step 3Dig to a depth of 8 to 12 inches, and amend the soil with plenty of compost to ensure the ideal combination of fertility, good drainage and moisture retention.
Step 4Remove all traces of weeds; they'll easily win out over garlic's grasslike foliage.
Step 5Plant only the largest cloves from the bulb, and discard any that are pitted or tinged blue-green - both are signs of mold.
Step 6Set unpeeled cloves, pointy end up, 2 inches deep and 5 inches apart. For giant "elephant" garlic, increase the depth to 3 inches and the spacing to 10.
Step 7Top-dress the plants with compost, and mulch to retain moisture and deter weeds. Mulch again after the ground freezes to protect plants from the cold.
Step 8Remove the mulch in spring so the sun can warm the soil, then add a fresh layer when new growth begins. To ensure large bulbs, cut back any flower stalks that develop, and spray young plants with compost tea (see "How to Make Compost Tea") once or twice during the spring.
Step 9Provide an inch of water a week until the foliage turns yellow or falls over - indications that bulbs are nearing maturity.
Step 10Clip garlic leaves to use any time, but remove no more than 1/4 of a plant's top growth or you'll reduce bulb size.
Sunday, March 21, 2010
How to Grow Common Sunflower (Helianthus Annuus)
Instructions.

Things You'll Need:
•Garden Spades
•Garden Trowels
•Plants
•Seeds
•Watering Cans
•Seeds
•Plants
Step 1Check out nurseries for sunflower seedlings, but these are among the easiest of plants to start from seed.
Step 2Plant seedlings after all danger of frost has passed in your region. Space according to label directions, anywhere from 6 inches to 3 feet.
Step 4Water just enough to keep soil moist. Sunflowers don't need much water or fertilizer.
Step 5Trim spent blooms to encourage more flowers.
Step 6Pull out and discard plants in fall, once frost kills them.
.
Wednesday, March 17, 2010
How to Grow Lavender!
By KCout,
Grow Lavender!Lavender is known the world over for its healing properties, glorious color and enchanting perfume, but did you know that it is very to grow? Lavender is grown all over the world and the looser and less nutritious the soil the better! There are literally hundreds of varieties and the color isn't always...well lavender! Lavender is nicknamed the 'first aid in a bottle' oil. Lavender produces an essential oil that has an inherent antibiotic action. It is also an astringent and moisturizer to skin. It alleviates aches, pains, and swelling from arthritis to injury to headache. Lavender also alleviates motion sickness. Learn how to grow this wonderful flowe
Instructions.
Step 1 Picking your plants!
The Lavender plants you pick depend on your climate. English Lavender, (Lavandula angustifolia), is the most hardy plant and grown the most widely. It is easy to mix in a perennial bed. This plant will endure subzero winters, but dislikes humid heat. If you live in a humid climate look for a LavanDIN instead of lavender. "Grosso and Provence" are the best lavandins. You can even chose your hue of lavender, but unless you get shoots from a "mother" plant, you will not have a consistent color or flower.
Step 2 Picking your spot to plant!
The most important factor about Lavender is drainage. Soggy areas should definitely be avoided. Incorporate organic matter if necessary to make a loose soil for easy drainage.
Lavender prefers a sloping bed in a sunny spot. A solution to that would be to heap soil in a pile about 12 to 18 inches high before planting the lavender. If your soil is mostly clay soil, dig out your hole and mix the clay with sand. Lavender plants cannot compete with aggressive weeds, so ensure your chosen spot is weed free. This is most important if you are planting a hedge of lavender, as weeding after they are planted can be a huge hassle. Weeding often becomes such a chore that Lavenders are overrun and eventually dies in a neglected hedge.
Step 3 Planting:
When planting lavender place the plants at least 2 feet apart. Start with 4-inch-pot sized plants. Leave plenty of room between plants for air circulation. If planting in pots, make sure to repot every spring into a larger container with fresh soil to allow the plant to continue to mature. A good, coarse, sterile potting soil with organic fertilizers works best.
Step 4 Watering:
Lavender does not like overhead sprinkler and could rot if they get too much water. Use a drip irrigation and water only when the bed is dry to a depth of 3 or 4 inches. While Lavender is extremely drought resistant once established, it grows larger and produces more blooms with regular watering. It is important to let the plant dry out a bit before soaking it again. In humid areas, this can be difficult and the excess moisture often causes death by rotting. Do not mulch lavender! It holds too m uch moisture.
Step 5 Fertilizer:
Wait about two years to fertilize the plants and then use an organic product such as fish emulsion. Feed the plants in spring when they start growing and again after harvesting in late summer. If you grow plants as annuals, you don't have to feed them at all.
Step 6 Pruning and Harvesting:
It takes about three years for Lavender to reach full size. Plants should be pruned every year immediately after bloom. Pruning should not be confused with harvesting. Pruning is necessary to extend the life of the plant because lavender gets very woody if not pruned. Lavender flower wand stems are a bright green and Lavender leaves are gray. Cut back not only the flower stem, but also about a third of the gray-leaved stems as well. Avoid pruning back so far that only woody stems with no leaves are showing as it may die.
Harvest the flowers according to end use. For a fresh bouquet pick when the flowers are in full bloom and scent. For dried bundles the stem must be harvested before the florets completely open. If you wait until the flower is open it will fall apart when they are dried. Take a handful of stems and cut them off at the base of the plant and then wrap rubber bands around them. To dry them hang them upside down. Drying takes about two weeks, but keep good circulation around your bundles to avoid them falling part or rotting. Harvesting the lavender for oil must be done at the peak of the day's heat. Essential oil can be extracted by steam distillation from the fresh flowers
How to grow watermelons from seed
Growing watermelons requires lots of space, lots of sun, lots of water and lots of nutrients.
They are greedy, rambling vines, like all plants in the cucurbiteae family (e.g. zucchini, squash, pumpkin, cucumbers...)
Watermelons are not particularly difficult to grow, but because they are so demanding I don't consider watermelons a good plant for beginner gardeners. (You can get lucky if you live in optimum conditions).
I also don't consider them a good plant for anyone with restricted space, water, or average soils.
You need to put a lot into a watermelon, and what you get out in terms of nutrition is not a lot... So from a permaculture point of view watermelons wouldn't be the very first thing to worry about...
But I get too many questions about growing watermelons. They are very popular. So I give in...
How to grow watermelons
Where and when can you grow watermelons?
In the true tropics the dry season (winter) is the best watermelon growing season.
Watermelons do not cope well with extreme heat or the humid, soggy conditions of our wet season/summer. Fungal diseases and bugs will wipe them out in no time.
If you live in a cooler climate, then summer is the time to grow watermelons.
You do need at least three months of reliably hot, sunny weather to grow and ripen a watermelon. During that time your average daily maximum temperature should be at least about 20-25°C or 70-80F. Warmer is even better.
(There are different watermelon varieties, so if you are at the low end of that, look for a faster maturing variety.)
Grow watermelons in full sun. You also need an abundant supply of water and nutrients (good soil).
And you need space. As I said, a rambling vine. They like to go wandering and smother everything around them.
Growing watermelons from seed
Watermelons are grown from seed. You may be tempted to use seed out of a melon you bought, but don't waste your time. It is almost guaranteed to be a hybrid.
Hybrid varieties are very special crosses that don't grow true to type. (You would end up growing what we call pig melons. A melon variety that's only good for feeding to the pigs...)
Buy your seed, and if possible buy an open pollinated heirloom variety. Because then you CAN use your own seed next year. The open pollinated varieties are also hardier.
You will find a lot more interesting varieties amongst the heirlooms then you cn find in the standard collection of you local gardening centre.
Start your watermelon seeds in the ground, right where they are supposed to grow. The soil should be at least 18°C for them to germinate.
Unless you have an extremely short growing season, do NOT start your watermelon seed in a pot or punnet. Do NOT buy watermelon seedlings from a nursery.
Watermelon seed germinates easily and quickly, within a few days. Watermelon plants outgrow the seedling stage very quickly, and they don't like transplanting. You don't save much time and you end up with a weaker plant.
Save yourself this totally needless extra work and stick your seeds in the ground, about two cm or an inch deep.
(If you have a long growing season, you may want to do several plantings, a few weeks apart.)
Watermelons need deep, rich, friable soils. To grow watermelons it helps to raise the soil (make mounds or ridges). Raising the soil has several advantages:
A mound or ridge is free draining (melons don't like wet feet). If you have heavy clay soil, definitely raise the bed.
Mounds are also good if the soil is as poor as mine. I just make a mound of good soil with lots of compost in it to grow watermelons. Sometimes I plant them in what's left over from a compost pile after I used most of the compost.
If you like growing things in neat rows, or if you want to plant a large area, grow watermelons on ridges, like the commercial growers do.
Rows should be about 2 m (6 ft) apart and the plants spaced at 30 cm/a foot apart. (Sow twice as many as you want, and keep the stronger ones.)
I prefer growing watermelons in clumps on a mound, in several different locations in the garden. (Mixing things up helps keeping pests and diseases at bay.) If you want several hills together, keep them about 2 m apart.
The mound should be about one metre square and a foot high. Then I plant about ten seeds in it, in three groups of three to four seeds each. The groups are spaced about a foot apart (30 cm).
After a few weeks I can see which watermelon plants grow the strongest, and I snip off the weaker ones, leaving only one seedling in each group. (Don't pull them up, cut them off. Or you disturb the roots of the others.)
If you have a very small garden but absolutely have to have watermelons, you can try growing them on a trellis. Really.
You need a very strong trellis, you need to train them up the trellis as they aren't climbers, and you need to support the developing fruit so the trellis holds the weight, not the plant.
It is a lot of work but it can be done...
Growing watermelon plants
Slugs and other seedling chomping critters like mulch and they like watermelons. Wait until the watermelons have outgrown the most vulnerable stage (where a slug can demolish them within minutes). Then mulch the area well.
Watermelons have very shallow roots and they need lots of moisture. The soil should never dry out, and mulch helps with that.
Mulch also keeps weeds down. Weeding could disturb the shallow roots, so it's better to not let them grow to start with.
Watermelons are VERY hungry plants. If your mulch is something like compost or aged animal manures, all the better. (Like all cucurbits, watermelons can handle fairly raw compost and manures.)
Otherwise, feed your watermelons regularly with something like pelleted chook manure or another organic fertiliser. (Ideally you should use a high nitrogen fertiliser in the early stages, but cut back on nitrogen and give them lots of potassium once they flower and fruit.)
When the vines are about two metres long, pinch out the tips. It encourages branching.
As your watermelon vines grow bigger they will start trying to take over more space. If they start to smother other things you can remind them about sticking to their area by gently moving the tips of the vines, so they grow into the right direction.
Watermelon flowering and fruiting
Watermelons grow male and female flowers on the same vine.
The smaller male flowers appear first. The female flowers are much larger (see the photo) and you can't miss them.
If you don't see any it could have several reasons: too hot, too cold, not enough water, not enough nutrients... In any way, it means the watermelon plant isn't happy.
If the plant does produce female flowers but the little fruit at the base of it shrivels up and dies, then the flowers are not getting pollinated.
Watermelon flowers are insect pollinated. If you suspect the insects aren't doing their job, you can do it yourself, just to be sure.
Hand pollination is best done early in the morning. Pull off a few male flowers and remove the flower petals. Then brush the pollen laden stamen against the stigma in the centre of the female flower, so the pollen sticks to it. Easy.
The first few female flowers on each branch will give you the best fruit.
To grow them as large as possible you can pinch out the tip of the branch after a couple of fruits have set (are starting to swell up).
But this isn't an essential step. You can also just let them go...
Harvesting watermelons
Telling when a watermelon is ripe is an art. You will get better at it with practice.
The first sign to look for is the curly tendril at the stem. Once it is dry, as in, totally dry not just starting to dry off, once it is totally dry, it may be ready...
Another sign is the light coloured patch on the bottom of the fruit. It is initially greenish, but as the melon ripens the green tinge diappears and it becomes yellowish. The skin overall becomes duller and tougher.
But the most popular way to tell if they are ripe is the sound. Knock them with your knuckles and listen for a dull, hollow sound. The unripe melons have a higher pitched sound. Keep thumping lots of them and comparing until you can tell the difference. Eventually you'll have to take a chance on one...
The only way to get good at this is to grow and harvest lots of watermelons!
Problems when growing watermelons
The biggest watermelon pest are the leaf eating beetles (they damage the flowers, too) like spotted and striped cucumber beetles, pumpkin beetles with or without dots, whatever you want to call them.
Those orange things...
They all look similar and all do the same: chomp away on your watermelon plants...
However, if they become a real problem it is mainly a sign that your watermelons are stressed.
A healthy watermelon in a balanced environment and in good soil should not attract too many beetles. Also, a watermelon should grow fast enough to cope with a few beetles.
The other main problem with growing watermelons is mildew, a fungus that makes the leaves look as if they were coated with white powder. The fungus thrives in damp, humid conditions.
The best you can do is to avoid getting the leaves wet. If you can't avoid overhead watering, do it first thing in the morning so they dry quickly. Never wet the leaves in the afternoon or evening.
In the tropics you probably won't be able to control the beetles or the mildew, once the build up for the wet season starts. And it isn't worth it anyway... The oppressive heat and the humidity just aren't good conditions for growing watermelons. Grow something that likes humditiy and wait for the next dry season to grow watermelons again.
Monday, March 8, 2010
How to Grow Avocado

Instructions.
Things You'll Need:
•avocado seed
•glass
•toothpicks
•water
•sunlight
Step 1Remove an avocado seed from an avocado and wash off the remaining avocado fruit using room temperature water.
Step 2Fill a water glass with room temperature water until the water comes to within an inch of the rim of the glass.
Step 3Hold the avocado with the pointy side up and poke four toothpicks into the middle of the avocado. Space the toothpicks out evenly around the center of the avocado seed. Insert each toothpick approximately ¼ to ½ inch into the avocado seed. When you look down at the avocado seed, it should resemble a plus sign, with a toothpicks sticking out in four directions.
Step 4Place the avocado seed wide side down, and pointy side up, into the water glass. The toothpicks should rest on the rim of the glass, so just the bottom of the avocado seed is submerged in water.
Step 5Place the avocado seed on a window sill in direct light indoors. Change the water every couple weeks and do not let it become murky or stagnant.
Step 6Watch your avocado seed grow into a tree. The roots should sprout within two to five weeks. Don't be alarmed when the avocado seed splits, as that this is normal.
Step 7Transplant your avocado tree into soil when it is several inches tall and has leaves. Avocado trees take over a decade before they grow avocados, and indoor plants may never grow flower or grow ripe fruit. However, it is fun to watch avocado trees grow from seed and they make a nice indoors plant.
Sunday, March 7, 2010
How to grow orchids
An orchid requires more attention than some houseplants, but you can grow these beautiful flowers if you can set up the proper environment to keep them healthy. Be prepared to invest time to care for this exotic addition to your home.
.Difficulty: ModerateInstructions.
Things You'll Need:
•Orchid plant
•Fertilizer for flowering tropical plants
•Potting mix with mulch
Step 1Place your orchid in a location that receives natural sunlight. The location shouldn't be too hot. If you put the plant in a window and the direct sunlight is too hot, particularly during the summer, move the orchid to a nearby table or counter where it can receive indirect light.
Step 2Purchase a plant light. If your environment does not offer enough natural lighting to grow an orchid, ask your local plant retailer to suggest an artifical light source.
Step 3Keep the orchid watered. An orchid is a tropical plant and its natural environment would be a moist area with humidity. Don't overwater the orchid or you'll damage it. Water the orchid sparingly every few days to keep it moist without drowning the roots. If you cannot provide humidity for your orchid, use a plant mister every day.
Step 4Pot your orchid in a small container. The delicate roots need the support of a smaller pot to thrive and grow. Some orchids need repotting annually, while others thrive for years in the same pot. Keep your orchid potted in a potting mix of mulch for tropical plants. If your orchid is thriving, leave it alone.
Step 5Fertilize your orchid with a plant food made specifically for orchids or tropical flowering plants. Ask your plant nursery specialist for suggestions based on where you live.
Wednesday, March 3, 2010
How to Grow Mushroom.
Some Mushroom Growing Basics for Beginners
If you are completely new to mushroom growing, I recommend that you skim through a copy of Growing Gourmet and Medicinal Mushrooms by Paul Stamets. Many libraries have the 2nd Edition, or you can order the expanded 3rd Edition through my link to Amazon.com (click on the title). Paul's book will give you a good overview of growing mushrooms of all kinds. It has plenty of pictures, and there are descriptions of most of the mushroom species that can be reliably cultivated. It is also a valuable reference volume, and I use it regularly. (Paul's earlier book with J.S. Chilton, The Mushroom Cultivator, is also a good overview, focusing more on Agaricus and other compost-grown species.) Don't be put off by all the talk about contamination and sterile procedure, though--that's where the peroxide method comes in!
As Paul's books explain, the process of growing mushrooms can be divided roughly into four steps:
1) Acquiring and maintaining a culture of mushroom tissue (called mycelium) of the mushroom strain you want. (A tissue culture is somewhat like a cutting of a plant. Starting with a tissue culture assures that you have a mushroom strain genetically identical to the one you want. Some growers start with spores, which are more like seeds. Spores may or may not give you a mushroom strain with the fruiting properties of the parent. Since spores cannot be grown in the presence of hydrogen peroxide, I always work with a tissue culture of mycelium. Tissue cultures--also called agar cultures or test tube cultures--of various species of mushroom can be purchased from commercial suppliers or they can be started from fresh mushrooms).
2) Using a bit of the tissue culture to begin some spawn (a kind of mushroom starter), which is usually grown on a small quantity of sterilized grain or sawdust.
3) Using the spawn to introduce mushroom mycelium into an organic material (substrate) chosen to support the formation of mushrooms.
4) Getting the actual mushrooms to form and grow once the substrate has been completely colonized by mushroom mycelium.
Starting with a kit
If you buy a mushroom kit, you are generally starting at step four. The commercial mushroom grower has already completed the earlier steps for you, and provided you with the mushroom culture ready to form mushrooms. You provide a proper environment, usually cool and moist. Getting mushrooms to form can be easy or hard, depending on the mushroom strain you are growing. Oyster-style mushrooms of the Pleurotus and Hypsizygus families are among the easiest to fruit. Lions Mane (Hericium erinaceus) is also quite easy. Maitake (Grifola frondosa) and Morels (Morachella species) are among the most difficult to get to form mushrooms. Shiitake (Lentinula edodes) falls somewhere in the middle. Button mushrooms are easy if you can keep the temperature steady around 65 degrees F.
Starting with purchased spawn
It is also possible to start at step three, by purchasing the "starter" (spawn) from a supplier and using that to introduce the growing fungus into an organic material that you have prepared yourself. There are a variety of possible substrates: straw, compost, logs, wood chips, and sawdust are common ones, but people have also used things like newspaper, cardboard, sterilized grain, coffee grounds, etc. depending on the mushroom species they want to grow.
Kinds of mushrooms and the substrates they prefer
In general, there are two broad classes of cultivated mushrooms: those that prefer to grow on compost, and those that prefer to grow on woody material. The common button mushroom and other Agaricus species fall into the first class, growing readily on compost, but they will also grow on straw. Oyster mushrooms, shiitake, reishi, maitake, and Lions Mane, all prefer woody materials such as sawdust, wood chips, or sometimes straw.
Compost
Each organic material requires a different procedure to render it free of competing organisms. Compost is the most time-consuming material to prepare, requiring a couple of weeks to mature. It needs to be allowed to heat to a temperature that neutralizes harmful species, without letting it get so hot that it kills beneficial microbes. The compost is not allowed to go completely through its natural cycle. Instead it is harvested somewhat early, when it is full of white actinomycetes bacteria that provide the nutrients that mushrooms love. The grower cools the compost, adds some gypsum (calcium sulfate) and mixes in the mushroom spawn.
Woody materials
Woody materials and straw can be prepared much more quickly than compost. Traditionally, these materials required a heat treatment, such as pressure sterilization, steam pasteurization, or hot water steeping, to eliminate competing organisms. The peroxide method has now added ways to prepare some substrates without heating. It can also prevent later contamination by airborne molds and bacteria, so using a material that is compatible with hydrogen peroxide addition can save a lot of trouble. For wood-decomposing mushrooms, wood pellet fuel, which disintegrates into sawdust when treated with boiling water, works very well in this regard, and so does wheat straw.
Getting Mushrooms to Form
The compost-loving species require a different procedure from the wood-loving mushrooms when it comes time to get the mushrooms to form. The compost-lovers usually need to have a soil-like layer called "casing," applied to the top of the culture, once the mushroom tissue has fully colonized the compost. The soil-like layer provides a reservoir of moisture, and it creates a low-nutrient zone (compared to the compost), signaling the mushroom tissue to start forming the fruiting bodies. The tiny mushroom buttons then begin to form in the casing layer. The grower keeps the casing moist by lightly watering it as the mushrooms enlarge.
With wood-loving species, the procedure for getting mushrooms to form varies a bit from one species to another, but it usually involves a shift in environmental conditions such as a drop in temperature, an increase in air circulation, and/or an increase in light levels.
The whole nine yards?
Once you have tried growing mushrooms from a kit and from spawn you've purchased, you will have a better idea whether you want to get involved in keeping agar cultures and growing your own spawn. These procedures require somewhat more commitment and attention to detail. Before the invention of the peroxide technique, it was generally only possible to keep agar cultures and grow spawn if you constructed a sterile work space, such as a glove box at the very least. With peroxide, it becomes possible to perform these steps in an ordinary kitchen, and grow the cultures just about anywhere that an appropriate temperature and light level can be provided. You still need to learn some basic "sterile technique"--simple procedures for handling cultures to keep them pure. But you won't need a sterile facility or a spotless house.
Thursday, February 25, 2010
How to Grow Leeks
Instructions.
Things You'll Need:

Things You'll Need:
•Bypass Pruners
•Compost Makers
•Fertilizers
•Garden Spades
•Garden Trowels
•Mulch
•Plants
•Seeds
•Seeds
•Plants
Step 1Choose a site that gets full sun and has well-drained soil with a pH of 6.2 to 7.0 (see "How to Have Your Soil Tested," under Related eHows). Work in plenty of compost and manure.
Step 2Buy started leek plants at your local nursery for planting about the time of the last spring frost. Otherwise, start seeds indoors at least 10 weeks before the average frost-free date.
Step 3Harden off seedlings when they're about the thickness of a pencil, then transplant them to the garden.
Step 4Set seedlings 4 to 8 inches apart, depending on the variety (check the directions on the seed packet or plant label). To encourage long, thin stems, plant leeks closer together; for thicker stems, set them farther apart.
Step 5Use a dibble (a planting tool that looks like a fat, pointed stick with a T-shaped handle) or the end of a rake handle to make a hole that's just deep enough to leave only the top inch of the transplant exposed. Set the transplant into the hole and fill it loosely with soil.
Step 6Make sure the plants get at least an inch of water a week; otherwise the stems will toughen. Mulch to conserve moisture, and side-dress with manure tea once a month.
Step 7Begin harvesting leeks as soon as they're big enough to use. Young, tender ones are good raw; once they reach scallion-size, they're better cooked.
Monday, February 15, 2010
How to Grow Lemon Trees

Instructions.
Things You'll Need:
•Mulch
•Plants
•Fertilizers
•Compost Makers
•Pruning Shears
•Shovels
Step 1Purchase a lemon variety adapted to your area. Most lemon trees are very sensitive to frost and grow best where winters are mild.
Step 2Plant the tree in a warm, sunny area where the soil drains well. Planting next to a house or under an eave will provide some frost protection.
Step 3Water the tree deeply once every 7 to 10 days in midsummer (newly planted trees may need more frequent watering until established). Water less often if it rains or if the weather is cool.
Step 4Apply 2 to 3 inches of organic matter under the canopy of the tree to conserve moisture.
Step 5Fertilize every four to six weeks from February to August.
Step 6Prune trees every year or two to keep them within bounds and easy to pick. Cut back new growth by one-fourth to one-third.

Step 7Protect trees from frost if temperatures are forecast to drop below 30 degrees F.
Step 8Harvest lemons when fruit reaches full size and color. Timing will vary by variety and growing area.
Friday, February 12, 2010
How to Grow Ginger
 Instructions
Things You'll Need:
•Bypass Pruners
•Compost Makers
•Fertilizers
•Garden Spades
•Garden Trowels
•Planting Containers
•Potting Soil
•Ginger Roots
Growing Ginger in a Container
Step
1Buy fresh ginger roots at a grocery store or an Asian market. Look for fat tubers with numerous buds.
Step
2Plant ginger in spring when you can supply warm enough temperatures, whether indoors or out. The dormant tubers will sprout only when the mercury hits 75 to 85 degrees F.
Step
3Use a container that's about 14 inches across and 12 inches deep and has excellent drainage. This size will hold three average-size tubers comfortably.
Step
4Fill the container with potting soil enriched with plenty of compost.
Step
5Soak the tubers in warm water overnight, then set them in the pot just below the soil surface, spacing them evenly, with the buds facing up.
Step
6Set the container in light shade, indoors or out, depending on the temperature.
Step
7Water lightly at first, then more heavily when growth starts. Keep plants dry in winter, when they're dormant.
Step
8Move plants outside only when the temperatures have reached 50 degrees F. In cooler weather, growth can be stunted.
Step
9Shield plants from high winds, and move them indoors at the first sign of cool temperatures.
Step
10Expect plants to reach maturity, and a height of 2 to 4 feet, in 10 months to a year.
Step
11Dig up new, young sprouts that appear in front of the main plants (they form their own tubers), use what you need, and freeze or replant the rest.
Step

Growing Ginger Outdoors in USDA Zone 10
Step
1Buy fresh ginger roots at a grocery store or an Asian market. Look for fat tubers with numerous buds.
Step
2Choose a lightly shaded site with rich, moist but well-drained soil. Work in plenty of compost to ensure the right combination.
Step
3Plant ginger in spring when temperatures are 75 to 85 degrees F. Soak the tubers in warm water overnight, then set them just under the soil surface with the buds facing up.
Step
4Water lightly at first, then more heavily when growth starts.
Step
5Shield plants from high winds, and cover them if temperatures dip lower than normal.
Step
6Expect plants to reach maturity, and a height of 2 to 4 feet, in 10 months to a year.
Step
7Dig up new, young sprouts that appear in front of the main plants (they form their own tubers), use what you need, and freeze or replant the rest.
Step
8Clip young, tender stems anytime.
Monday, February 8, 2010
How to Grow Spinach
How to Grow Spinach
Contributor By eHow Contributing Writer
Instructions.
Things You'll Need:
•Bypass Pruners
•Compost Makers
•Fertilizers
•Fish Emulsions
•Floating Row Covers
•Garden Spades

•Plants
•Shovels
•Limes
Step 1 Choose a site that gets full sun in cool weather and partial shade in warmer temperatures. Soil should be light, fertile and moisture-retentive, with a pH of 6.0 to 7.0.
Step 2 Dig in plenty of well-cured manure to ensure the right soil conditions and to provide the nitrogen necessary for good leaf production.
Step 3 Sow spinach seeds directly into the garden as soon as the ground can be worked, normally anywhere from four to eight weeks before the last expected frost. (Because spinach resents transplanting and seeds germinate well in temperatures as low as 50 degrees F, there's no advantage to buying plants or to starting seed indoors.)
Step 4 Plant seeds 1/2 inch deep and 2 inches apart in wide rows. For a continuous harvest, sow every two weeks until daytime temperatures start to average 75 degrees F.
Step 5 Begin sowing fall crops in mid-August in cool climates, later in warm ones.
Step 6 Thin seedlings to 6 inches apart when the plants are 4 inches tall. Be ruthless; crowded plants are more likely to bolt (go to seed prematurely), and you can use the cuts in salads.
Step 7 Keep the soil moist, and feed plants manure tea or fish emulsion every 10 days until they're 6 inches tall (see "How to Make Manure Tea").
Step 8 Mulch established plants to conserve moisture and deter weeds, and cover the area with floating row covers to discourage insects.
Step 9 Cut spinach leaves as you need them from the outside of the plant, or harvest entire plants when they reach maturity and before they begin to flower. (If you see buds starting to form at the center, cut the whole plant immediately.)

Contributor By eHow Contributing Writer
Instructions.
Things You'll Need:
•Bypass Pruners
•Compost Makers
•Fertilizers
•Fish Emulsions
•Floating Row Covers
•Garden Spades

•Garden Trowels
•Mulch
•Plants
•Shovels
•Spinach Seeds
•Limes
•Shovels
•Limes
Step 1 Choose a site that gets full sun in cool weather and partial shade in warmer temperatures. Soil should be light, fertile and moisture-retentive, with a pH of 6.0 to 7.0.
Step 2 Dig in plenty of well-cured manure to ensure the right soil conditions and to provide the nitrogen necessary for good leaf production.
Step 3 Sow spinach seeds directly into the garden as soon as the ground can be worked, normally anywhere from four to eight weeks before the last expected frost. (Because spinach resents transplanting and seeds germinate well in temperatures as low as 50 degrees F, there's no advantage to buying plants or to starting seed indoors.)
Step 4 Plant seeds 1/2 inch deep and 2 inches apart in wide rows. For a continuous harvest, sow every two weeks until daytime temperatures start to average 75 degrees F.
Step 5 Begin sowing fall crops in mid-August in cool climates, later in warm ones.
Step 6 Thin seedlings to 6 inches apart when the plants are 4 inches tall. Be ruthless; crowded plants are more likely to bolt (go to seed prematurely), and you can use the cuts in salads.
Step 7 Keep the soil moist, and feed plants manure tea or fish emulsion every 10 days until they're 6 inches tall (see "How to Make Manure Tea").
Step 8 Mulch established plants to conserve moisture and deter weeds, and cover the area with floating row covers to discourage insects.
Step 9 Cut spinach leaves as you need them from the outside of the plant, or harvest entire plants when they reach maturity and before they begin to flower. (If you see buds starting to form at the center, cut the whole plant immediately.)

Sunday, February 7, 2010
How to Grow Carrots
Instructions.Things
You'll Need:

•Garden Trowels
•Planting Containers
•Shovels
•Shovels
Step 1
Choose a site that gets full sun (carrots will tolerate light shade but won't do as well). Soil should be light, with a pH of 5.8 to 6.8 (see "How to Have Your Soil Tested").
Step 2
Dig to a depth of at least 12 inches, and remove all traces of rocks and other debris - even a small twig could injure a carrot's growing tip, stunting the root or making it fork.
Step 3
Add plenty of organic matter; it will lighten heavy soils and increase the moisture retention of sandy ones. Carrots grow sweeter and less fibrous in soil that remains moist.
Step 4
Sow carrot seeds directly about two to three weeks before the last expected frost in cool regions; in warm climates, you can plant in fall, winter or spring. (Like most root crops, carrots rarely appear as started plants in nurseries.)
Step 5
Speed germination, which can take 10 days or more, by soaking seeds in water for 6 hours before you plant them.
Step 7
 Thin seedlings before the tops become entwined: Either clip off the greens with scissors, or pull the roots very gently from the ground so you don't disturb the remaining plants. Allow 3 to 4 inches between carrots, depending on the variety (check the seed packet for details).
You'll Need:

•Carrot Seeds
•Compost Makers
•Fertilizers
•Garden Spades
•Garden Trowels
•Mulch
•Shovels
•Shovels
Step 1
Choose a site that gets full sun (carrots will tolerate light shade but won't do as well). Soil should be light, with a pH of 5.8 to 6.8 (see "How to Have Your Soil Tested").
Step 2
Dig to a depth of at least 12 inches, and remove all traces of rocks and other debris - even a small twig could injure a carrot's growing tip, stunting the root or making it fork.
Step 3
Add plenty of organic matter; it will lighten heavy soils and increase the moisture retention of sandy ones. Carrots grow sweeter and less fibrous in soil that remains moist.
Step 4
Sow carrot seeds directly about two to three weeks before the last expected frost in cool regions; in warm climates, you can plant in fall, winter or spring. (Like most root crops, carrots rarely appear as started plants in nurseries.)
Step 5
Speed germination, which can take 10 days or more, by soaking seeds in water for 6 hours before you plant them.
Step 6
Make early sowings shallow to capture warmth from the sun; sprinkle the seeds on the soil surface, tamp them gently and cover them with a thin layer of finely sifted compost. If planting later, when the soil has warmed up, plant seeds between 1/4 and 1/2 inch deep.
Step 7
 Thin seedlings before the tops become entwined: Either clip off the greens with scissors, or pull the roots very gently from the ground so you don't disturb the remaining plants. Allow 3 to 4 inches between carrots, depending on the variety (check the seed packet for details).
Step 8
Spray young plants once with compost tea (see "How to Make Compost Tea") to ensure good growth, and mulch with compost to deter weeds and retain moisture. Young plants need at least an inch of water a week, but cut back on watering as they near maturity (check the seed packet for timing).
Step 9
Begin harvesting carrots when they've turned deep orange.
Sunday, January 31, 2010
How to Grow Asparagus
How to Grow Asparagus.
 By eHow Contributing Writer
•Garden Trowels
•Mulch
•Plants
•Shovels
•Plants
•Shovels
Step 1 Choose a site where your plants won't be disturbed - and where you and they can happily coexist for 10 to 15 years.
Step 2 Grow asparagus in partial or full sun (it performs best in full sun) in soil with a pH of 6.5 to 7.0, amended with plenty of organic matter that is rich in potassium and phosphorus.
Step 3 Buy asparagus crowns (established root systems with dormant top growth) at your nursery or through a catalog. In cool regions, plant them in early spring when the soil temperature has reached about 50 degrees F. In warm regions, plant in late winter.
Step 4 Make a 7-inch-deep, V-shaped furrow (or more, depending on how many crowns you're planting) and in each one spread a handful of wood ashes, a handful of bonemeal, and an inch layer of compost or well-rotted manure.
Step 5 Soak the crowns in compost tea for 10 minutes or so and lay them on their sides on top of the organic matter, 12 to 16 inches apart, in rows 4 feet apart. (See "How to Make Compost Tea.")
Step 6 Fill in the furrows gradually as shoots emerge, taking care not to cover any foliage; eventually, the furrow will be level with the soil surface. Don't bother spreading out the roots; they'll find their way down.
Step 7 Weed diligently and mulch heavily with chopped leaves or straw after you've filled in the furrows.
 Step 8 Side-dress plants with a balanced organic fertilizer in late summer, and top the bed in organic mulch in the fall.
Step 9 Give new plantings one to two inches of water a week; after that, water only when rainfall is scant.
Step 10 Refrain from harvesting any spears during your plants' first year in your garden. Each spear needs to "fern out" so that the roots can grow stronger and more productive. The second year you can pick a few that reach about the size of your index finger. The third year, pick finger-size spears for two to four weeks in the spring. In subsequent years, take all the finger-size spears you want for six to eight weeks, or until the spears that come up are thin and spindly.
 By eHow Contributing Writer
 Instructions.Things You'll Need:
•Compost Makers
•Fertilizers
•Garden Spades
•Mulch
•Plants
•Shovels
•Plants
•Shovels
Step 1 Choose a site where your plants won't be disturbed - and where you and they can happily coexist for 10 to 15 years.
Step 2 Grow asparagus in partial or full sun (it performs best in full sun) in soil with a pH of 6.5 to 7.0, amended with plenty of organic matter that is rich in potassium and phosphorus.
Step 3 Buy asparagus crowns (established root systems with dormant top growth) at your nursery or through a catalog. In cool regions, plant them in early spring when the soil temperature has reached about 50 degrees F. In warm regions, plant in late winter.
Step 4 Make a 7-inch-deep, V-shaped furrow (or more, depending on how many crowns you're planting) and in each one spread a handful of wood ashes, a handful of bonemeal, and an inch layer of compost or well-rotted manure.
Step 5 Soak the crowns in compost tea for 10 minutes or so and lay them on their sides on top of the organic matter, 12 to 16 inches apart, in rows 4 feet apart. (See "How to Make Compost Tea.")
Step 6 Fill in the furrows gradually as shoots emerge, taking care not to cover any foliage; eventually, the furrow will be level with the soil surface. Don't bother spreading out the roots; they'll find their way down.
Step 7 Weed diligently and mulch heavily with chopped leaves or straw after you've filled in the furrows.

Step 9 Give new plantings one to two inches of water a week; after that, water only when rainfall is scant.
Step 10 Refrain from harvesting any spears during your plants' first year in your garden. Each spear needs to "fern out" so that the roots can grow stronger and more productive. The second year you can pick a few that reach about the size of your index finger. The third year, pick finger-size spears for two to four weeks in the spring. In subsequent years, take all the finger-size spears you want for six to eight weeks, or until the spears that come up are thin and spindly.
Wednesday, January 27, 2010
How to Grow Eggplant from Seeds
Instructions

Eggplant seeds
Planting pot
Fertilizer
Soil
Gardening tools
Sunlight, heater, heating mat
Warm environment
Patience
Step 1 Eggplant blossomPlant seeds 6-8 weeks indoors before transplanting. The best time to start is in the first week of April.
Step 2 They are very slow to germinate. Plant several seeds in a pot, 1/2" deep. Keep them warm by using a seedling warmer on the bottom of the soil, or put them near a heater, or in a sunny spot near a window in your house. Keep in mind, but don't be discouraged that only 60-65% of the seeds you plant will germinate; they are very sensitive to temperature and don't grow outside the range of 75-90 degrees F.
Step 3 Young plants need warmth to grow, place them in a warm location with bright light. A week prior planting outside, move the plants to a cool area and feed them less water; cut off about 1/4 the amount you used.
Step 4 If you plant seeds in April, germination will complete in mid to late June. Remove only the strongest seedling. Discard the weak ones; they die soon anyway after transplant, so don't think they are wasted.
Step 5 In mid to late June when weather is consistently fair and warm, transplant outdoors to a hot and bright location, where it is also wind-proofed.
Step 6 Eggplants prefer loose, sandy soil with organic materials (like peat moss) and compost. Plants need heavy watering and heavy fertilizing. Surround each plant with a 2" mulch to help retain moisture around roots. Space each young plant 24 inches apart and spread generously of granular 5-10-10 fertilizer around roots before covering the planting holes. Fertilize every three weeks by sprinkling a handful of granular on the ground around each plant. Mature plants may need staking to help them stand especially when they have fruits.

Step 7 Fruits maturingIf temperature is under 70 degrees F, the fruit will not develop. Also, leaves will grow in minimum sunlight but does not encourage fruit growth.
Step 8 Aphids, beetles are common pest to eggplants. A spray of water usually remove aphids; wash the plants early in the day. Use cardboard collar around the plants or hand pick larvae and eggs if beetles are a problem. You can also buy pesticides specifically for killing these insects - avoid spraying chemicals on the fruit.
Step 9 Harvested eggplants Pick fruit when slightly immature. Constant harvest fruit to encourage flower production. Eggplant is ready to harvest with smooth, glossy and firm skin.

Things You'll Need:
Eggplant seeds
Planting pot
Fertilizer
Soil
Gardening tools
Sunlight, heater, heating mat
Warm environment
Patience
Step 1 Eggplant blossomPlant seeds 6-8 weeks indoors before transplanting. The best time to start is in the first week of April.
Step 2 They are very slow to germinate. Plant several seeds in a pot, 1/2" deep. Keep them warm by using a seedling warmer on the bottom of the soil, or put them near a heater, or in a sunny spot near a window in your house. Keep in mind, but don't be discouraged that only 60-65% of the seeds you plant will germinate; they are very sensitive to temperature and don't grow outside the range of 75-90 degrees F.
Step 3 Young plants need warmth to grow, place them in a warm location with bright light. A week prior planting outside, move the plants to a cool area and feed them less water; cut off about 1/4 the amount you used.
Step 4 If you plant seeds in April, germination will complete in mid to late June. Remove only the strongest seedling. Discard the weak ones; they die soon anyway after transplant, so don't think they are wasted.
Step 5 In mid to late June when weather is consistently fair and warm, transplant outdoors to a hot and bright location, where it is also wind-proofed.
Step 6 Eggplants prefer loose, sandy soil with organic materials (like peat moss) and compost. Plants need heavy watering and heavy fertilizing. Surround each plant with a 2" mulch to help retain moisture around roots. Space each young plant 24 inches apart and spread generously of granular 5-10-10 fertilizer around roots before covering the planting holes. Fertilize every three weeks by sprinkling a handful of granular on the ground around each plant. Mature plants may need staking to help them stand especially when they have fruits.

Step 8 Aphids, beetles are common pest to eggplants. A spray of water usually remove aphids; wash the plants early in the day. Use cardboard collar around the plants or hand pick larvae and eggs if beetles are a problem. You can also buy pesticides specifically for killing these insects - avoid spraying chemicals on the fruit.
Step 9 Harvested eggplants Pick fruit when slightly immature. Constant harvest fruit to encourage flower production. Eggplant is ready to harvest with smooth, glossy and firm skin.
How to Grow Cabbage 2
How to Grow CabbageInstructions.

 Step 3 Protect the seedlings after transplant from insects and pests, by covering the cabbage rows with a lightweight cover. Aphids, cabbage worms, and cabbage maggots can spoil your harvest.

By Lacy Enderson
Things You'll Need:
•Shade-Cloth
•Flat
•Lightweight Row Cover
•Compost
•Fertilizer
Step 1 Grow your cabbage in at least 50% shade or under a shade-cloth. Start them in flats.
Step 2 Transplant the cabbage so the first real leaves are just above the soil. This should be deep enough to keep the plants stable. Pack the soil so the root system is completely covered.
 Step 3 Protect the seedlings after transplant from insects and pests, by covering the cabbage rows with a lightweight cover. Aphids, cabbage worms, and cabbage maggots can spoil your harvest.
Step 4 Make sure to plant your cabbage in a rich soil blended with compost. Fertilize your cabbage patch once a month with a complete fertilizer. Water your cabbage everyday.
Step 5 Plant your cabbage from fall to spring if you live in the West. Plant in mid-summer for colder climates.
How to Grow Chilli Peppers
How to Grow Chilli Peppers

Instructions.
Things You'll Need:
•Chili pepper plants Shovel or garden tiller Compost Ironite Peat moss Sand
Grow Chilli Peppers
Step 1 Prepare the garden for the pepper plants. Dig or till the area that you will need for the number of plants you want to grow. Depending on the size of the variety you are growing, you will need spacing to put them 12 to 16 inches apart. Add compost, quartz sand, ironite and peat moss to the tilled soil. The amounts you will use will depend on the size of your garden, but roughly use a shovel full of peat moss, sand and compost and a couple of handfuls of ironite per each plant. Turn over the mixture into the soil.
Step 2 Plant your pepper plants when the soil temperature reaches about 60 degrees and there is no chance of a returning frost. Place them in the ground at the same level as they are in the containers you purchased them in and space them 12 to 16 inches apart in an area that gets the most direct sunshine.
Step 3 Water the plants deep in the evenings and let them dry out during the day. There is no need to water during the day unless the plants show signs of significant wilt. Using trickle irrigation during the evening works well.
Step 4 Fertilize with a vegetable fertilizer once a month starting a month after planting. There should be enough nutrients in the soil from the compost and ironite that you shouldn't need the fertilizer right away.
Step 5 Go out to your garden daily and pull up any weeds. Weeds will take water and nutrition away from your pepper plants and can possibly strangle them. Don't wait and only pull them once a week or you might get overwhelmed and the weeds will have already stressed your plants

Subscribe to:
Posts (Atom)